July Quickbooks Tip

5 QuickBooks Online Reports You Should Run Regularly 


There are numerous QuickBooks Online reports that you should be consulting at regular intervals. But you need these five at least every week. 


QuickBooks Online’s Dashboard, the first screen you see when you log in, provides an effective overview of your company’s finances. It contains at-a-glance information about your recent expenses, your sales, and the status of your invoices. It displays a simple Profit and Loss graph and a list of your account balances. Scroll down and click the See all activity button in the lower right and your Audit Log opens, a list of everything that’s been done on the site and by whom. 

 You can actually get a lot of work done from this page. Click the bar on the Invoices graph, for example, and a list view opens, allowing you access to individual transactions. Click Expenses to see the related Transaction Report. Below the list of account balances, you can Go to registers and connect new accounts. 

 Other Pressing Questions 

 The Dashboard supplies enough information that you can spot potential problems with expenses and sales, accounts, and overdue invoices. But you’re likely to have other tasks that require attention. How’s your inventory holding up? Are you staying within your budget? How about your accounts payable – will you owe money to anyone soon? 

 QuickBooks Online offers dozens of report templates that answer these questions and many more. If you’ve never explored the list,  I suggest that you do so. It’s impossible to make plans for your company’s future without understanding its financial history and current state. 

QuickBooks Online has many reports that can provide real-time, in-depth insight    into your company’s financial health. 


Comprehensive and Customizable 

 When you click Reports in your QuickBooks Online toolbar, the view defaults to All. The site divides its report content into 10 different sections, including Business OverviewSales and CustomersExpenses and Vendors, and Payroll. Each has two buttons to the right of its name.  

 Click the star, and that report’s title will appear in your Favorites list at the top of the page. This will save time since you’ll be able to quickly find your most often-used reports. Click the three vertical dots and then Customize to view your customization options for that report (you’ll have access to this tool from the reports themselves). 

 Necessary Knowledge 

 You can, of course, run any report you’d like as often as you’d like. Most small businesses, though, don’t require this frequent intense scrutiny. But there are five reports that you do want to consult on a regular basis. They are: 
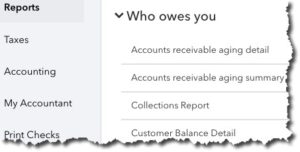
  1.  Accounts Receivable Aging DetailDisplays a list of invoices that haven’t yet been paid, divided into groups like 1-30 days past due, 31-60 days past due, etc.  
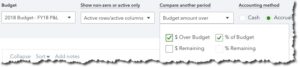
  2. Budget vs. ActualsJust what it sounds like: a comparison of your monthly budgeted amounts and your actual income and expenses. 


Warning: Some reports let you choose between cash and accrual basis. Do you know the difference and which you should choose? Ask Me. 

You can customize QuickBooks Online reports in several ways. 


  1. Unpaid BillsHelps you avoid missing accounts payable due dates by displaying what’s due and when. 
  2. Sales by Product/Service DetailTells you what’s selling and what’s not by displaying date, transaction type, quantity, rate, amount, and total. 
  3. Product/Service ListAn accounting of the products and/or services you sell, with columns for price, cost, and quantity on hand. 

 Customization, Complex Reports 

 Note that there’s a category of reports in QuickBooks Online named For My Accountant. That’s where we come in. The site includes templates for reports that you can run yourself, but that you’d have difficulty customizing and analyzing. These standard financial reports—which, by the way, you’ll need if you create a business plan or try to get funding for your business—include Balance SheetStatement of Cash Flows, and Trial Balance. 

 You don’t need to have these reports generated frequently, but you should be learning from the insight they provide monthly or quarterly. I can handle this part of your accounting tasks for you, as well as any other aspect of financial management where you need assistance. Contact me, and I’ll see where I might help provide the feedback and bookkeeping expertise that can help you make better decisions for the future of your business. 

 Social media posts 

 QuickBooks Online reports pick up where the Dashboard leaves off, providing dozens of templates ready for your company data. Do you know how to best use them? 

 You can create some QuickBooks Online reports using either cash or accrual basis. Do you know the difference? Ask me if you don’t. 

 Overwhelmed by the number of reports QuickBooks Online offers? Click the star next to the ones you run most often, and they’ll appear in Favorites. 

 QuickBooks Online contains several reports in a section titled For My Accountant. These are complex financial reports that I can run and analyze for you. 

Don’t Have a Budget? QuickBooks Online Can Help

Don’t Have a Budget? QuickBooks Online Can Help
The hardest part of creating a budget is getting started. QuickBooks Online provides tools that can jump-start the process.
 
You know you should have a budget. You’re aware that it can help you stay on track with your company’s income and expenses throughout the year. Maybe you’ve even tried to make one before, but you got discouraged by the mechanics or by the difficulty of estimating money in and out for the next 12 months.
 
June may not be the beginning of your fiscal year, but that doesn’t mean you can’t make a serious effort to start building a budget that can help you rein in expenses and set revenue goals.
 
Here’s a look at QuickBooks Online’s budgeting features.
 
Creating the Framework
Before you begin, you’ll want to make sure that your fiscal year is set correctly in QuickBooks Online. Click the gear icon in the upper right, then click Your Company | Account and Settings | Advanced. If the First month of fiscal year isn’t correct, click the pencil icon over to the right and change it. Then click Save and exit out of this window.
 
Click the gear icon again and select Budgeting, then click Add budget in the upper right.


QuickBooks Online asks you the questions that need to be answered before you start filling in your budget grid.

The first thing you’ll do is give your budget a descriptive name by entering it in the Name field. Next, open the drop-down list under Fiscal year and select the correct 12-month period. You can create your budget in one of three intervals: Monthly, Quarterly, or Yearly. If you want to populate your budget with numbers from this year or last, make that selection in the Pre-fill data? field.
 
There’s one more option at the top of the Budgets Grid screen that’s not shown in the image above. You can Subdivide by Customer, Class, or Location. This can be useful if you want to view budget data specific to a subset of entries in each of those categories. You could, for example, choose three customers and view only their numbers in the grid individually, one at a time.
 
Providing Your Numbers
Once you’re satisfied with the selections you’ve made, click Create Budget in the lower right. The screen will refresh and display a grid that you can edit.
 
Let’s say you’re working on a budget for the second half of 2018. QuickBooks Online brought in your numbers for January-May. You see that the numbers don’t vary much from month to month on one specific line item, so you’re going to assume that they will continue to be true (unless you know something that will affect it after May). You could enter a rough average of the first five months in the JUN field.
 
Hover your cursor over the arrow to the side of that field, and this sentence appears in a small bubble: Click to copy the value across on the row. QuickBooks Online will then enter that number in the JUL through DEC fields.


QuickBooks Online can save you some time as you enter data in your budget grid fields.

When you’re done entering data in all of the fields relevant to your business, click Save in the lower right and close the window. Your budget will now show up in the list.
 
Tip: If you have multiple blank rows and don’t want them to be displayed, click the gear icon in the upper right corner of your budget page. Click in the box in front of

Hide blank rows to create a checkmark.

The Hard Part
QuickBooks Online simplifies the mechanics of creating a budget, but it’s up to you to supply the numbers. There’s lots of common-sense advice that experts offer for this process, like:
  • Remember seasonal upswings and downswings.
  • Make your goals as realistic as possible. You might want to create separate budgets for “needs” and “wants.”
  • Track your expenses carefully for a period of time so you can estimate more confidently.
  • Create reports regularly that compare your budget vs actuals.
QuickBooks Online can help you with that last piece of advice; it offers a report called Budget vs. Actuals. You’ll find it in the Business Overview group.
 
We can help, too. Once we understand a little more about your business structure and goals, we can take a look at your income and expense history and make some personalized recommendations. Connect with us soon, and we can start you on the path to a more focused financial future.

Using Product and Service Records in QuickBooks Online

Last month, we created product and service records in QuickBooks Online. This month, we’ll explore how they’re used on the site

If you ever did your accounting manually, you probably remember how tired you got of writing or typing the same things over and over. You may have had your customers’ addresses practically memorized, and your product price list was always close at hand, though you knew that by heart, too.

QuickBooks Online eliminates that duplicate data entry, saving time and reducing errors dramatically. Because of the product and service records you’ve created, completing sales and purchase forms can now be an easy, accurate task. You’ll also have fast access to information about your inventory levels and the profit you make on items. You’ll know what’s selling and what’s not, and when it’s time to reorder.

Here’s how.

Picking Products

Much of your accounting work probably consists of filling out forms. Whenever you create one of these invoices or sales receipts or purchase orders, you already know that you can open a drop-down list and select the name of a customer or vendor. QuickBooks Online lets you enter data about what is being bought or sold in the same way.

To see how this works, open an invoice form and complete and/or verify the fields at the top (customer, date, terms, etc.). Click in the first PRODUCT/SERVICE field, and then click the down arrow to see the list of items and services you sell.

 photo QBO 0518 image 1_zpspsfprqnh.jpg

When you create a sales or purchase form, you’ll be able to select the appropriate product or service from the drop-down list – or add a new one.

When you select an item, the description and price will fill in automatically. You’ll have to add the quantity and click in the box below the column labeled Tax (if applicable). QuickBooks Online will calculate the total cost of the product or service on that line. If you need to enter additional sales, proceed to the PRODUCT/SERVICE field in the second line and repeat those actions until you’re done and can save the transaction.

Working with Items

What do you do when you need more information about a specific product than just its description and price? Do you have to return to its individual record?

No. QuickBooks Online includes a great tool that provides real-time updates on your inventory items and lets you work with them. Click the Sales tab in the left vertical menu, and then on the Products and Services tab at the top. The table that opens displays numbers for every item’s quantity on hand and reorder point. Look at the end of each line, and you’ll see a drop-down list labeled Edit that looks like this:

 photo QBO 0518 image 2_zpsmwaev5ja.jpg

QuickBooks Online’s Products and Services page provides real-time inventory updates, as well as item-management tools.

As you can see, there are a number of actions you can take here on individual products.

Warning: If you think there’s a reason you should Adjust quantity or Adjust starting value, please talk to us first. Your inventory records need to be precise. We can schedule a session to go over this and other concepts you need to understand in order to keep inventory counts accurate.

You can take some of these actions on multiple items simultaneously. Click the down arrow in the Batch actions field above this Edit menu. Click the boxes in front of the products you want to work with and select the desired activity (unavailable ones will be grayed out in the list). Take extra care with this mass modification tool.

Multiple Reports

 photo QBO 0518 image 3_zpsmbc3ieak.jpg

QuickBooks Online contains templates for numerous inventory-related reports that you can customize.

QuickBooks Online’s Product and Services screen may be all you need in your daily work, but there will be times when you need more analytical assistance. You can turn to the site’s specialized reports for more in-depth scrutiny. Click the Reports tab in the left vertical pane. Make sure the All Reports list is active and select Manage Products and Inventory to see what’s available, including:

  • Inventory Valuation Detail.
  • Sales by Product/Service Detail.
  • Physical Inventory Worksheet.

Reports are easy to run but can be difficult to customize correctly and interpret. If we’re not working with you already on the complex standard financial reports that should be reviewed monthly or quarterly, talk to us. The more you understand about the financial status of your company, the better your decisions will be.

Creating Product and Service Records in QuickBooks Online

QuickBooks Online is good at managing and tracking inventory – as long as you’ve created thorough records.
When you first started your business, you might have been able to keep track of your merchandise by counting manually. But as you and your product list grew, this became impractical. You might have recorded it all in a spreadsheet, or even a box full of notecards.
 
QuickBooks Online has a much better way. Whether you sell products or services or both, you need records of specific items to use in transactions and reports. Those records are especially important if you have physical inventory; they can store details that help you know, for example, when it’s time to reorder.
 
Building a database of your inventory is time-consuming work that requires a lot of detail. But the information it supplies will be of great significance as you make critical buying decisions.
 
Detailed Templates
It’s easy enough to create your individual records. To get started, click the gear icon in the upper right corner of QuickBooks Online and select Products and Services under Lists. A table will open that will eventually contain a comprehensive list of what you sell. Click New in the upper right corner, and the Product/Service information pane slides out. You’ll see your four options here:


  • Inventory: Products you buy and/or sell
  • Non-inventory: Products you buy and/or sell that don’t require tracking
  • Services: Services you sell
  • Bundle: Products and/or services that you sell together
We’ll focus on the first option. Click Inventory. Enter the product’s Name and SKU (if there is one) and click the pencil icon to upload a photo if you’d like. If this item is going to be a sub-product or service of another, you’d click the box in front of that option and select the “parent” product or service from the drop-down list.
 

To create an Inventory item record in QuickBooks Online, you’ll have to fill in several fields.
How many do you currently have of that item? Enter the number in the field to the right of Initial quantity on hand, and then enter the As of date in the next box. When your stock level hits a certain number, you’ll want to reorder more. Enter that number in the box to the right of Reorder point.
 
Your item needs to be assigned to an Inventory asset account for tracking and reporting purposes. This field should default to Inventory Asset. If it doesn’t, or if you want a more thorough explanation of this element of accounting, contact us.
 
Enter a description of the item in the Sales information box; this will appear on sales forms. What will your customers be charged for it? This is the Sales price/rate. The Income account should automatically display Sales of Product Income, and you should click in the box in front of Is taxable if that’s the case.
 
If you buy the item to resell, enter a description in the Purchasing information box, and provide your Cost, the price you pay when you buy the item from another source. The Expense account should default to Cost of Goods Sold.
 
When you’re done, save the record.
 
Viewing Your Records
 

Once you create a record for an item or service, it will appear in this table.
 
You don’t have to create records for absolutely every product or service you sell before you start using them. When you create an invoice, for example, and you open the drop-down list under Product/Service, the option at the top of the list will be + Add new. Select that, and the Product/Service information pane opens. You can create a record on the fly.
 
To get to the list of the product and service records you’ve created, click the gear icon in the upper right and select Products and Services, like we did early on here. You’ll see a screen similar to the one pictured above. You’ll also notice that you can link to several action screens from each entry.
 
If you maintain careful item records, you’ll be able to create a number of reports that can advise you on the state of your inventory. Click on Reports in the toolbar, and then All Reports | Manage Products and Inventory. These reports are fairly self-explanatory, but by customizing them, you can get even more focused insight. We can help you with this. We’d also be happy to go over any other aspect of inventory-tracking and management that’s confusing. Just let us know when you want to get started.

Getting Ready for Payroll in QuickBooks Online

Getting Ready for Payroll in QuickBooks Online
Taking on your company’s payroll with QuickBooks Online? Knowing what you’re up against ahead of time will make your setup tasks much easier
Payroll is probably the most complex element of small business accounting. Not only are you directly responsible to your employees, but you also have to make sure you’re handling everything related to benefits and payroll taxes correctly.
Whether you’re switching from a manual system to QuickBooks Online, or you’ve just hired your first employee, you’ll soon discover that the site can make your payroll-related tasks much more organized and accurate – speeding up the process tremendously.
But before you start getting ready for your first payroll run, you have a lot of setup work to be done. Be sure to leave yourself time before those first paychecks are expected.
Our Purpose Here
 
We’ll provide some step-by-step instruction, but initially, we just want you to see what information you’ll need to have available and how QuickBooks Online handles it. This is not meant to be a payroll setup tutorial.
Building a Backbone
 
There’s no particular order set in stone for your payroll preparation tasks, although you will need to provide some background information about your company and its policies before you can start creating employee records.
QuickBooks Online doesn’t walk you through the steps required. It does though display a page with links to all of the data you’ll have to enter. Click the gear icon in the upper right, and then click Payroll Settings. You’ll see this screen:


QuickBooks Online’s 

Payroll Settings screen displays links to the pages where you’ll manage your setup tasks.


You would have entered information about your Contact Information and Work Locations (under the Business Information heading) when you first signed on to QuickBooks Online. At the same time, you would have been exposed to the Chart of Accounts, which already has accounts designated for payroll. You can see them by clicking Preferences | Accounting, but please do not customize these. If modifications are needed, we’ll do them for you.
Payroll Policies
 
How often will you pay your employees? Go up to the Payroll heading in the upper left and click on Pay Schedules. Click Create and open the drop-down list next to Pay Period to select the frequency desired. Then enter the date for the first payroll you’ll run in QuickBooks Online and the end date for the period that it covers. Click the box below if you want this to be the default setting for all employees. Then click OK to return to the previous page.
Open the Vacation and Sick Leave Policies window. If you don’t yet have accrual rules for these paid days off, let us help you here. It’s complicated. When you’re done, click the back arrow to return to the Pay Policies window and select Deductions/Contributions. Are you offering benefits like health insurance? You’ll need to have your paperwork and information handy before you start completing this section.


Before you can pay employees, you’ll need to have entered information about the benefits you offer so you can withhold dollars for them.
Click the plus sign (+) in front of Add a New Deduction/Contribution and complete the fields here, then click OK. You’ll assign these deductions to employees on their individual records in QuickBooks Online. If there are any Employee Garnishments needed (like child support), click the down arrow next to Add Garnishment for and select the worker from the list. You’ll provide details for these in the window that opens. This information was most likely provided to you by the agency requesting it. When you’re done, click OK.
Taxes and More
 
If you’re new to payroll and have never dealt with payroll taxes before, you’re going to need our help getting this complicated element set up correctly. Even if you have, we’d recommend that you let us work with you. QuickBooks Online does a good job of providing guidance here, but failure to submit payroll taxes (or pay them incorrectly) can lead to penalties and fines – or worse.
There are other setup tasks you’ll need to complete, like:
  • Connecting your payroll bank account to QuickBooks Online.
  • Creating employee records.
  • Setting payroll production preferences.
Setup is by far the most challenging part of processing payroll in QuickBooks Online. Once that’s done, you’ll just be entering hours and making modifications. Please do connect with us if you’re planning to take this on, and we’ll make sure you get a good start.

Customize QuickBooks Online Using Settings

 Customize QuickBooks Online Using Settings

You can start using QuickBooks Online the first time you sign in. However, your tasks will be easier and faster, if you customize it for your company.

 
QuickBooks Online was designed to be used by a variety of business types; that’s one reason why it’s such a popular small business accounting website. It was built to be versatile. That is, whether you sell hard drives or you service HVAC systems, you can customize it to “fit’ your company.
 
This is why your first order of business when you start using QuickBooks Online should be to click on the small gear icon in the upper right corner. The window that opens displays links to all of the site’s options – a collection of choices that’s called “Preferences” in desktop QuickBooks.

When you click on the small gear icon in the upper right corner of QuickBooks Online, this window containing the site’s many options will open.

 
Global Settings
 
The first screen you should visit is Account and Settings. This page is divided into five sections, accessible by clicking on one of the tabs below:
 
Company -Your company’s name and contact information appears here, as well as identifying details like the tax form you file, as well as your industry.
 
Sales -You can do a lot of customizing here that will affect your company’s selling activities. For example, you can specify preferred invoice terms and delivery method, and indicate whether to turn on features like:
  • Shipping
  • Custom fields and transaction numbers
  • Discounts
  • Quantity and price/rate
  • Inventory quantity on hand
You can also access the site’s tools for customizing the design and layout of your sales forms (invoices, receipts, etc.).
 
Expenses -You’ll toggle expense-related tools on and off here. You can choose to, for example, track expenses and items by customer and make them billable. Will you be using purchase orders? What will your default bill payment terms be?
 
Payments -Here, you’ll be able to set up a merchant account so you can accept credit cards and bank transfers from customers through QuickBooks Online. If you already have a merchant account, you can connect it here.
 
Advanced -There’s a good reason why this section is named “Advanced.” You may not be familiar with some of the concepts here, like “closing books” and specifying default accounts for items like Markup. We can go over these things with you and help you make decisions.
 
Other entries in this list are easier to complete, though you may still want some guidance. Will you support multiple currencies? Automatically apply credits and invoice unbilled activity? Make individually-tracked time activities billable to customers?
 
Other Preferences
 
There are many other areas in this window that you’ll want to explore before you start processing a lot of transactions in QuickBooks Online. If more than one person will have access to the site (we’ll assume you’re the Administrator), you must click on Manage Users. Here, you can set limits of what other employees can access. Click New on the screen that opens to launch this mini-interview, and follow its instructions:


You can restrict users to specific areas of QuickBooks Online.

Other preferences you should look at include:
  • Chart of Accountsonly to familiarize yourself with the accounts that make up the backbone of your accounting data. You’ll use these in transactions. Please do not make any changes here without talking to us.
  • All Lists – to see what’s available here, like Classes, Recurring Transactions, and Payment Methods.
  • Products and Services – to start building records for the items and services you sell. If you carry inventory and have never worked with a website that helps you manage it, please let us go over these concepts with you.
  • Budgeting – if you plan to create a budget. QuickBooks Online contains a tool that will accommodate this critical task.
  • Audit Log – if multiple people will be using QuickBooks Online. It tracks all activity by date and user.
QuickBooks Online is easy to use, but there’s a lot to learn upfront about customizing it to meet your company’s accounting needs. It’s natural to feel a bit overwhelmed at first. Let us help you get through those early days of use.  Connect with us, so we can walk you through the basics.

It’s the most wonderful time of the year (for taxes)!

While we are all thinking of presents and sugar plums (what are sugar plums anyway), it’s easy to forget about all those taxes, statements, and other fun mandatory filing requirements that come at the end of the year.

Here’s are just a few of the items for your “to do” list:

  1. Gather information for 1099’s – That means sending a form W-9 (here’s the link IRS form W-9) to all your vendors who perform services for you.  Common examples of these are landscapers, cleaning folks, graphic designers, accountant, lawyers, etc.  Any vendor that your pay $600 or more during the calendar year who is unincorporated gets a 1099.  They are due to the recipients by January 31st, so get that information now!  Having trouble sleeping?  Here’s a link to the IRS Instructions for Form 1099.
  2. Check all your employee information for accuracy – W-2’s are due to employees by January 31st and 4th quarter payroll forms are due by January 15th.  You should make sure that you have up to date address information and information on benefits (if you are required to report them) so that this process will go smoothly.  Also, start gathering new withholding forms from employees and check to make sure that all the employee files are up to date (I-9’s completed, correct emergency contact information, etc.)
  3. Make estimated tax payments for the 4th quarter – Unless you are a non-profit, remember to make your 4th quarter estimated tax payment by January 15th.  In most cases, you must have paid in at least 90% of your total tax liability by this date in order to avoid underpayment penalties.

Non-profits have additional reporting requirements like sending out annual giving statements (officially called “gift acknowledgement”) so you might have to add this to your list if you run this type of organization.  Have questions about what is required for this?  Here’s another fun IRS publication for late night reading.

Quickbooks has many tools to help with these tasks and make your life a little easier.  If you need help, be sure to contact us or your accounting professional.  It’s better to ask us for help now so we can make sure you are on track to meet all your filing requirements and not incur penalties!

Apps, Apps, and more Apps – which ones are right for me??

As the universe of apps that integrate with QuickBooks Online seems to expand exponentially on a daily basis, how do you pick the right one?  I recently attended a session on this very topic at #QBConnect.  The presenter, Byron Patrick, did a great job of identifying the steps in this process:

  1.  Identify the reasons & goals
  2. Determine the must haves
  3. Identify the options
  4. Filter down the choices
  5. Do your research
  6. Make your selection

Download Byron’s presentation here: Taming the Wild West of Apps

Hello world! Welcome to the mind of a QB SuperGenius!

My passion is teaching people about how to best use their QuickBooks to solve problems and deliver information about the money side of the business so that they make good decisions and spend more time doing what they love! If you are successful, I am successful.

So I created this blog to keep you up to date on the changes constantly being made in the Intuit universe and what products and services are available to help you do your job better, faster, and cheaper. I want to help you stay out of trouble from an accounting and tax perspective. And I want to help you grow your business!

Let me know what issues you’d like to hear about. QuickBooks questions? Accounting questions? Pictures of my cats? This blog is for you so what would you like to know? P.S. I’m always happy to post pictures of my cats!